
The Background
In the previous post on the basics of Guided Selling, we set up a simple example for arriving at a configurable computer. As you’ll recall, our buyer ended up wanting a Gaming Laptop (also to be used for Trailhead projects of course). In this post, we’ll use the Product Configuration Initializer to extend Guided Selling and provide an alternative to a standard CPQ configuration in the QLE. There is very little documentation around this feature outside of the Salesforce developer document here, and we’ll get an idea of how to use it in this example.
Scenario Review
As a continuation of our previous computer purchase example, we’ll start with the Guided Selling process and step through to arrive at a Gaming Laptop, and then configure Product Options for it. We will default all Product Option selections through this process and end up with a configured quote based on only Guided Selling completion.
Additional Product and Product Option Setup
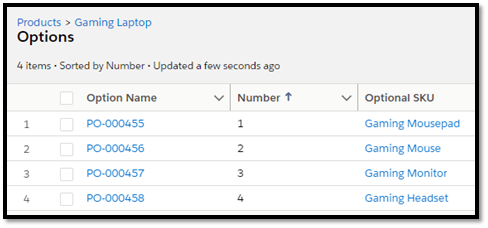
First we need to finish the master data setup required for CPQ. Previously we set up the high level computer systems, and now we need to get into the subcomponents. Once we have created those subcomponents, we’ll assign them as Product Options to the Gaming Laptop only (after all, I don’t want to set up a bunch of products not being used for this post!).
Guided Selling – Additional Process Inputs
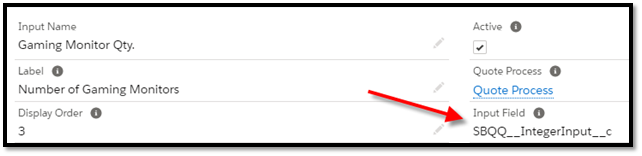
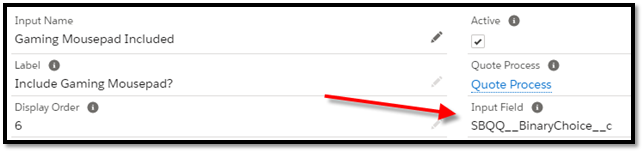
We will now add a few additional Process Inputs to allow us to tell the Product Configuration Initializer which of these Product Options to select. Let’s create an input for each of the following: Gaming Monitor (Qty. Input), Gaming Mouse (Qty. Input), Gaming Headset (Checkbox) and Gaming Mousepad (Checkbox). For Quantity inputs we set our ‘Input Field’ as ‘SBQQ__IntegerInput__c’ and for Checkboxes as ‘SBQQ__BinaryChoice__c’. Do not be fooled here as the default ‘IntegerInput__c’ and ‘BinaryChoice__c’ DO NOT work and will cause a javascript error in the QLE – this caused me a lot of frustration.
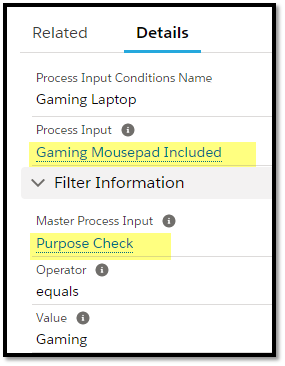
For each of these Process Inputs, let’s also create a Process Input Condition so that they only appear when a Mobile computer is selected. Here is one example where we will show Gaming Mousepad Process Input only when Purpose is set as ‘Gaming’.
Create Product Configuration Initializer
Now it is time to create the Product Configuration Initializer. This will allow us to convert these new Process Input selections into Product Options to be added to the Quote itself. The instructions for doing so are in the developer documentation. First we create the controller as referenced…
public with sharing class TestProductInitializer {
    public Product2[] products {get; set;}
    public Boolean skip {get; set;}
    Map<String,SBQQ__ProductOption__c> optionsByCode = new Map<String,SBQQ__ProductOption__c>();

    public TestProductInitializer() {
        // Set "skip" to true to bypass the configuration page, or to false to on the config page after the initializer has completed
        skip = true;

        // Retrieve product (bundle)
        String pidsStr = ApexPages.currentPage().getParameters().get('pids');
        String[] pids = pidsStr.split(',');
        products = [SELECT Id, Family, (SELECT SBQQ__OptionalSKU__r.ProductCode, SBQQ__Quantity__c, SBQQ__Selected__c FROM SBQQ__Options__r) FROM Product2 WHERE Id IN :pids];
        for (SBQQ__ProductOption__c opt : products[0].SBQQ__Options__r) {
            optionsByCode.put(opt.SBQQ__OptionalSKU__r.ProductCode, opt);
        }

        System.debug('options by code: '+optionsByCode);
        System.debug('apex pages: '+ApexPages.currentPage().getParameters());

        Decimal monitorQty = toInteger(ApexPages.currentPage().getParameters()?.get('Gaming Monitor Qty.'));

        Decimal mouseQty = toInteger(ApexPages.currentPage().getParameters()?.get('Gaming Mouse Qty.'));
        String gamingHeadset = ApexPages.currentPage().getParameters()?.get('Gaming Headset Included');
        String gamingMousepad = ApexPages.currentPage().getParameters()?.get('Gaming Mousepad Included');

        System.debug('gamingHeadset check: '+gamingHeadset);

        // Perform any logic you want here

        // Then select options in the bundle, for example:

        //Set options and quantity.
        if(monitorQty > 0) selectOption('DemoNS_GamingMonitor', monitorQty);

        if(mouseQty > 0) selectOption('DemoNS_GamingMouse', mouseQty);
        if(gamingHeadset == 'Yes') selectOption('DemoNS_GamingHeadset', 1);
        if(gamingMousepad == 'Yes') selectOption('DemoNS_GamingMousePad', 1);
    }

    private Decimal toInteger(String value) {
        return String.isBlank(value) ? 0 : Decimal.valueOf(value);
    }

    private void selectOption(String code, Decimal qty) {
        optionsByCode.get(code).SBQQ__Selected__c = (qty > 0);
        optionsByCode.get(code).SBQQ__Quantity__c = qty;
    }
}
Next we create the VF page that will be connect the QLE to this controller logic.
<apex:page controller="TestProductInitializer" contentType="text/xml" showHeader="false" sidebar="false">
    <products skipConfiguration="{!skip}">
    <apex:repeat var="product" value="{!products}">
        <product id="{!product.Id}">
            <apex:repeat var="opt" value="{!product.SBQQ__Options__r}">
                <option id="{!opt.Id}"
                    selected="{!opt.SBQQ__Selected__c}"
                    quantity="{!ROUND(opt.SBQQ__Quantity__c, 0)}"/>
            </apex:repeat>
        </product>
    </apex:repeat>
    </products>
</apex:page>
I won’t go through all the details of the code here, but effectively we’re collecting a series of parameters from the configuration page of Guided Selling (using the Process Input Name), performing logic against those parameters, and then using that logic to select a set of Product Options as outputs. For our example, we’ll focus on Gaming Monitors as an example as the others follow the same process. Here we get the parameter value from the page for Gaming Monitor Qty. Then if that value is greater 0 we pull the Product Option for the Gaming Monitor and give it a Qty. equal to that value. You can see that we can apply all sorts of logic here to do far greater things, as we’re just taking Process Inputs and giving outputs based on our logic. Making this extensible is where things get tricky so that you could make changes without hitting the controller every time (Labels may be a good option for example).
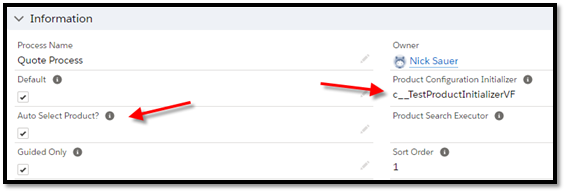
Update Quote Process with the Initializer Reference
There are a couple more changes to make to our Quote Process to tie this together. First, let’s add ‘Auto Select Product?’ = true, and next we’ll put the name of the Product Initializer VF page with a ‘c__’ prefix. In our example this is ‘c__TestProductInitializerVF’. This can also be done at package level, but doing it this way allows for different initializers for different Quote Processes. Note that Quote Process level setting will override the package level setting.
Trying It Out
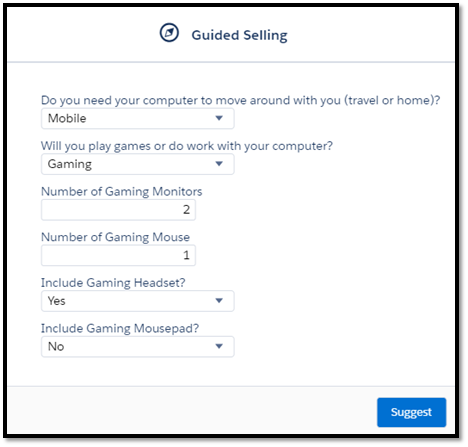
Now we enter our Quote, go to the QLE, and launch Add Products. Guided Selling appears and we set to Mobile => Gaming and now our new Process Inputs appear for Qty. input and Boolean selection (Yes/No). Enter accordingly with the below picture as an example.
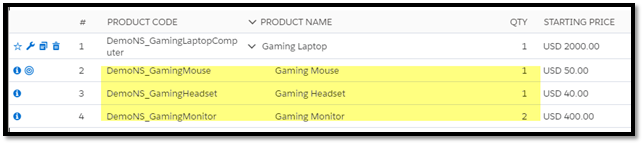
Hit ‘Suggest’ and then pause to let the Product Configuration Initializer do its work in defaulting the Product Options and Quantities. Note there will be a brief pause in the auto-selection on the Product screen before you’re returned to the QLE. As we can see the logic in the Product Configuration Initializer has correctly set the Product Options and quantities as Quote Lines with no configuration in the QLE itself. Success!
Bonus Tip
When Process Input selections are made, Process Input Selections are saved against the Quote. To ‘reset’ a configuration from data, you can delete these records.

This was a bit of a dense topic, but hopefully this provides some ideas around use of the Product Configuration Initializer as part of CPQ. There are a number of interesting applications that could be achieved using this approach. Thanks for reading!


[…] the prior two posts on Guided Selling, and Product Configuration Initializer, we reviewed some alternative approaches to configuration using Salesforce CPQ. In this point […]
[…] the prior three posts on Guided Selling, and Product Configuration Initializer, we reviewed some alternative approaches to configuration using Salesforce CPQ. We then […]
[…] Product Configuration Initializer […]
Hi Nick,
This is very useful information which you have provided!!
I have been playing around with Product Configuration Initializer. I’m trying to figure out how can I show nested product2 bundle. I have tired using nested Product and Option tag to display 2nd level of product2 bundle and also tried to use PageBlockTable(VF Page start throwing XLM parse error!! 🙁 if I use anything other than the tags mentioned in your blog).
Would you please suggest how can I achieve this 🙂
Hmm not really sure unfortunately. It’s probably worth opening a ticket and seeing if there is guidance available. I only ever did very simple setup as outlined- never ended up using at scale.