Customize Service Appointment Bundling behavior via record maintenance
Related Posts:
- Part 1, Appointment Bundling Setup
- Part 2, Appointment Bundling – Automated Bundling
- Part 3, Appointment Bundling – Live Bundling
- Part 4, Appointment Bundling – Custom Configurations **You are Here**
Related References:
- Salesforce Help Article on Setting Up Automated Bundling
- Salesforce Help Article on Creating Appointment Bundling Policy
- Salesforce Help Article on Appointment Bundle Config
- Salesforce Help Article on Appointment Bundling Limitations
- Appointment Bundling API
Background
Appointment Bundling offers a great deal of flexibility and customization through the maintenance of related records. In previous posts we went over Setup, Automated Bundling and Live Bundling. In this post we’ll take a look at each of the customization options available to meet particular business requirements.
Update Appointment Bundle Config
The Appointment Bundle Config record is used across all bundling in the environment. There is a default policy that can be left in place or updated. You can only have a single Appointment Bundle Config, so if you want to create a new one, you’ll need to delete the existing one first.
The purpose of the Appointment Bundle Config is to manage how bundling behaves based on the Status of the Service Appointments. We declare here which Statuses can be added/removed from Bundles, and what Status should be applied to member Appointments when they are removed from the Bundle (and what Statuses should be exempt from change). Additionally, we can declare which Statuses should be pushed from Bundle parent to Bundle members (and which Statuses to not propagate). An example Config is provided below. Make sure to check the help texts, as many of the multi-select fields, if left empty, will mean that all Statuses are considered.

Appointment Bundle Policy Setup
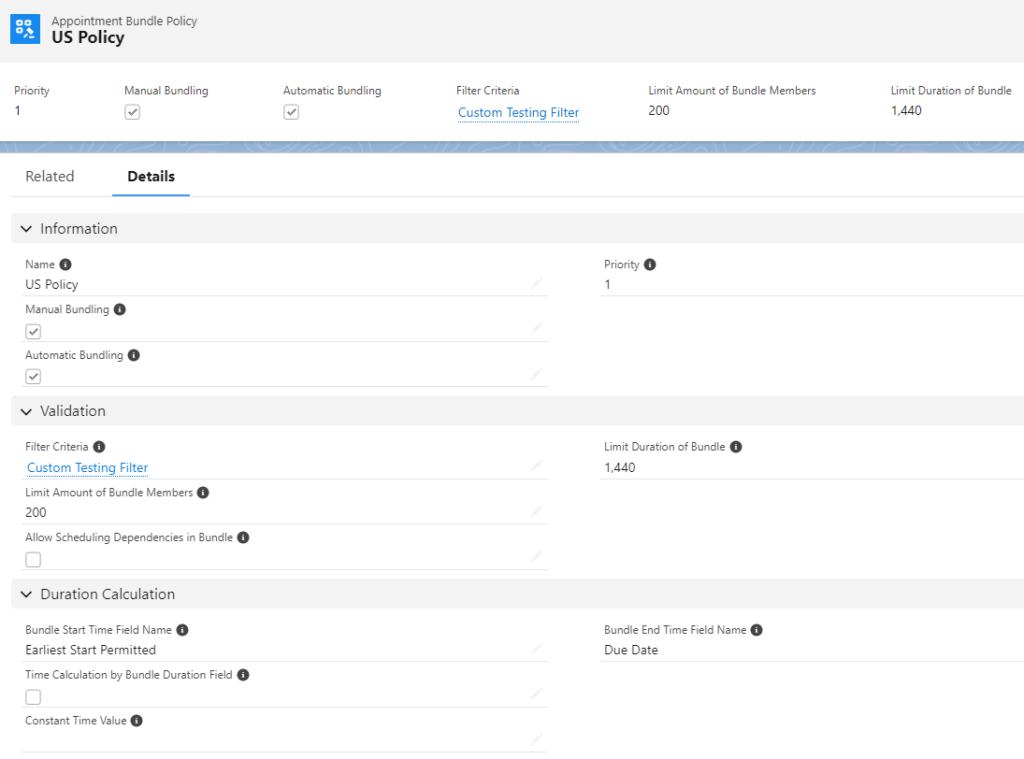
Now we’ll start with the Appointment Bundle Policy itself, which is the overall container for appointment bundling and all related selections. Navigate to the ‘Appointment Bundling Policy’ tab (reminder to see Part 1 if you do not find this tab). Select the ‘Default Bundling Policy’ and clone, or create a new Policy. Fill in the details with the behavior you want to see from bundled Service Appointments. In the example below, I’ve set the Bundle Duration to be 1 day, have allowed the maximum Bundle Members (200), and set the Bundle Start = Earliest Start Permitted, and the Bundle End = Due Date. Importantly, make sure that ‘Automated Bundling’ is checked so that this policy is used for the Automated Bundling run, and that the Priority is set to ‘1’ so that this new policy takes precedence.

Appointment Bundle Policy – Recordset Filter Criteria
Notice on the Appointment Bundle Policy the lookup field ‘Filter Criteria’ pointing to the Recordset Filter Criteria object. Here we can create a Recordset Filter Criteria record and apply against the Appointment Bundle Policy. Only those Service Appointments matching the Filter Criteria would then be considered for bundling.
To create the Recordset Filter Criteria, we navigate to the tab (unhide it for your profile if you don’t see it). Click on New, and fill up the required fields. Here we are targeting the Filtered Object of ‘Service Appointment’ and checking the Condition that Subject = ‘Test Filter Criteria’. Of course this isn’t a valid business scenario but it makes it easier for testing that only these Service Appointments will be bundled.

Once done with the Filter Criteria setup, we have to update the corresponding field on the Appointment Bundle Policy.

Appointment Bundle Sort Policy
The Appointment Bundle Sort policy differs based on whether it is applied to manual or automated bundling. For manual bundling, we are defining in which order the bundle members will be sorted within the bundle. For automated bundling, we’re defining in which order the Service Appointments will be evaluated for addition to a bundle — in other words, in which order they’ll be added if they qualify. The help documentation has a good example of when this would be especially important.
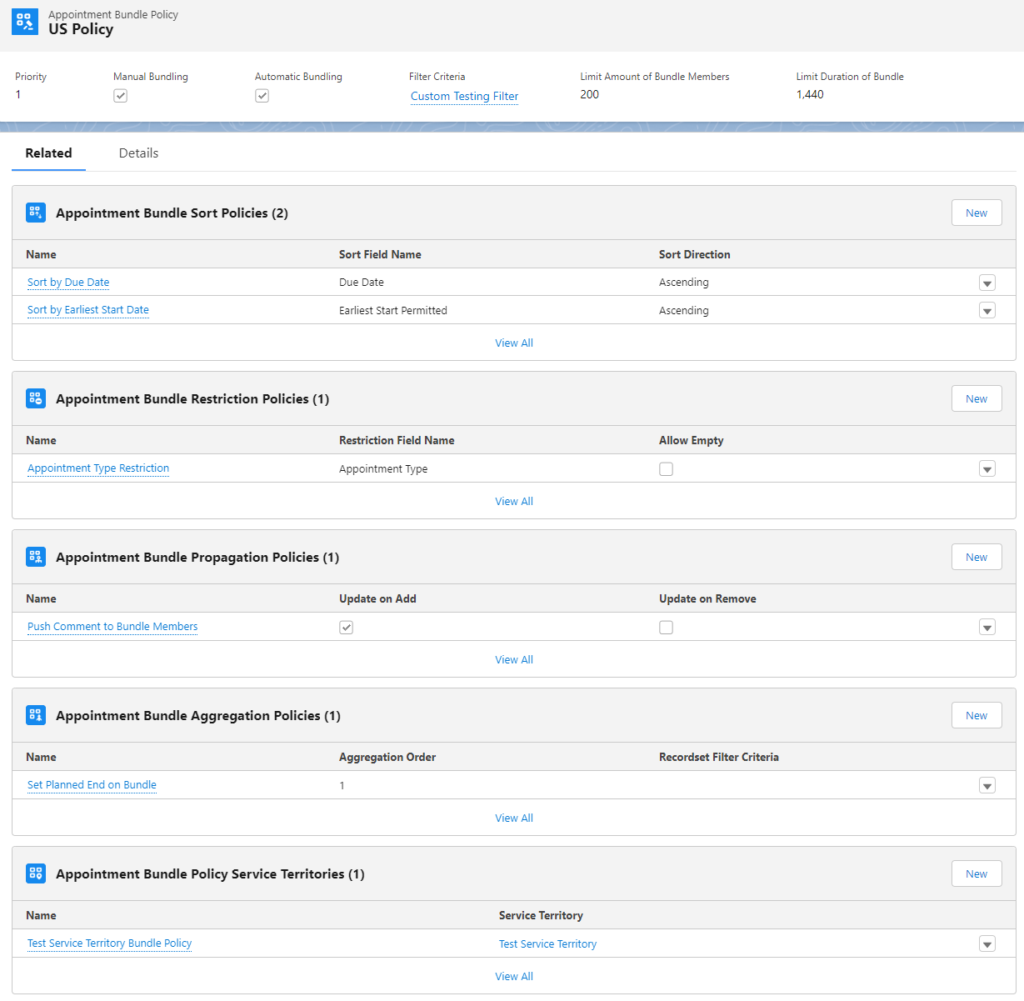
Let’s set up an example under our policy. Under ‘Appointment Bundle Sort Policies’ click on ‘New’. We will create a Sort Type of ‘Sort Within a Bundle’ with Sort Order of ‘1’. The sort will be on ‘Due Date’ ‘Ascending’ so that bundle members are ordered to be completed in order of which is due first.

Here we can add additional Sort Policies to further Sort Within a Bundle, add separate Sort Policies to determine the order in which Service Appointments are evaluated by Automated Bundling, etc. For our purposes, let’s add an additional sort for occasions when the Due Date is the same between 1 or more Appointments. In that case, we’ll want to go first to the bundle member that has an Earliest Start Date before the others. We’ll set the Sort Order to ‘2’ so that this comes after the Due Date sort.

Appointment Bundle Restriction Policy
Appointment Bundle Restriction Policies allow us to only bundle Service Appointments that have the same field values in one or more restriction fields. At least one Restriction Policy is required for Automated Bundling as we discussed in a previous post. For manual bundling, we can set on the Restriction Policy whether or not we want it to apply – in this way, we can essentially add a validation to prevent improper bundling.
From the Appointment Bundle Policy, click on ‘New’ from the Appointment Bundle Restriction Policies. We’ll restrict based on ‘Appointment Type’ field on the Service Appointment, and use ‘Restrict in Manual Mode’ and ‘Restrict in Automatic Mode’ to have this Restriction apply to both Manual Bundling and Automated Bundling. We won’t use ‘Allow Empty’, which would allow Service Appointments with no value in Appointment Type to be bundled under this policy as well. We could add additional Restriction Policies as well to further divide up which types of Appointments go into each bundle.

Appointment Bundle Propagation Policy
Appointment Bundle Propagation Policy determines how updates to fields in the Bundle Service Appointment (parent) push down to Bundle Member Service Appointment (child) fields. Salesforce recommends that Status is not controlled by Propagation, but rather via the Appointment Bundle Config looked at above.
From the Appointment Bundle Policy, click on ‘New’ from the Appointment Bundle Propagation Policies. We’ll add some logic that pushes the Bundle Comment to the Bundle Member Comment field. Note that we can also map across fields — in other words, we only have to match on field type, and not on Service Appointment field itself. We can also use Constant Values, and there are configurable Date Values for use as well.

Appointment Bundle Aggregation Policy
Appointment Bundle Aggregation Policy is basically the reverse of the Appointment Bundle Propagation policy, in that Aggregation Policy defines how bundle member values can be rolled up to the parent appointment bundle. There are a number of different options, but this essentially works like an aggregate rollup that fires when the Appointment Bundle is created or new Service Appointments are added to the Bundle (unless we check ‘Aggregate only when the bundle is created’ option).
From Appointment Bundle Policy related list for Appointment Bundle Aggregation Policies, we click on ‘New’. Set a name, make ‘Aggregation Order’ (order in which the rollup is done) ‘1’, set the Bundle’s ‘Target Field’, ‘Aggregation Action’ and ‘Source Field’. Different fields will be disabled/enabled based on selections made in these values. Note also that we can use Recordset Filter Criteria here to filter down the bundle members that will be considered as part of the aggregation. For our use case, we’ll do one Aggregation Policy and set the Bundle’s Planned Schedule End to the latest Planned Scheduled End from the bundle members. Note on the Default Bundle Policy some other common options used here.

Appointment Bundle Duration Downscales
Appointment Bundle Aggregation Duration Downscales is a bit of a confusing concept. The idea behind it is to account for one-time activities done against a Bundle that would not have to be repeated for each bundle member. If those bundle members had been scheduled individually, then the one-time activities would have had to be conducted for each one, so this is a way to account for the reduction of activities performed (lower duration) as part of a bundled job. Downscales allow for multiple records per Appointment Bundle Aggregation Policy, which allows for accounting for any number of one-time activities and the associated savings should they not have to be performed against within the bundle.
Accessing these downscales is a bit different as they are related to the Appointment Bundle Aggregation Policy and impact those policies directly. Go to the related list and click ‘New’ on Appointment Bundle Aggregation Duration Downscales. Enter a name for what the activity is that you’re downscaling for — in our case, we’ll use Parking as a simple example. If we want the downscale to apply for all bundle members after the first Service Appointment, then we’ll enter ‘From Bundle Member Number’ of 2, and leave the ‘To Bundle Member Number’ empty, so that all bundle members except for the first have this downscale applied. Enter a ‘Percentage of Reduction’ to declare how much shorter the duration for these Service Appointments will be given that the first Service Appointment absorbed the duration that otherwise would have applied to each bundle member had they been scheduled individually. We’ll use 10% in our example to get a 10% duration reduction for each Appointment after the first.

Appointment Bundle Policy Service Territories
The last step is required before the Appointment Bundle Policy will work for Automated Bundling. We need at least one Service Territory assigned to the Appointment Bundle Policy via the Appointment Bundle Policy Service Territories. Salesforce recommends having only one Service Territory assigned to each Bundle Policy, and if there are any more they need to have matching enhanced scheduling and optimization settings. This creates a bit of problem in terms of data maintenance for organizations that have a ton of Service Territories, as the proliferation of Bundle Policy structures will be extreme.
To create the Appointment Bundle Policy Service Territory, navigate to the Appointment Bundle Policy related list and click New. Name the junction object record, and select the Service Territory to associate. Click Save.


Checking Final Configuration
When we’re done building up the custom configuration, our new Appointment Bundle Policy should look as follows.


Due to the number of different scenarios that would need to be tested to document the effect of all these changes, and the length of this post already, we won’t go through the normal end to end testing done on other posts. I plan to try out a number of different configurations going forward to check out all of different behaviors available, and hope this will encourage you to do the same!
Wrapping Up
Thanks for reading. Appointment Bundling offers a wide range of customization options that should allow you to find multiple potential approaches to solve your business requirements.


[…] Part 4, Appointment Bundling – Custom Configurations […]